Introduction
Introduced in XmlLayout v1.18, the new Model - View - ViewModel module allows you to attach an XmlLayout View (Xml file) to a ViewModel, which you can then manipulate and have the view automatically updated to match.
Known Issues
-
Currently, XmlLayout MVVM does not support WebGL or IL2CPP, as it requires the use of the System.Remoting namespace which Unity has not implemented into IL2CPP/WebGL.
This has been tested up to and including Unity 2019.2, and unfortunately the Remoting namespace is still not present in Unity's IL2CPP implementation. It is not known if it will ever be implemented.
This is also likely true for iOS, but I have not yet been able to test this on an iOS device. -
Currently, XmlLayout MVVM does not support Unity's experimental implementation of the .NET 4.6 runtime.
As of Unity 2018.2, .NET 4.x is now supported.
Recent changes
- XmlLayout v1.68:
- .NET 4x is now supported.
- XmlLayout v1.70:
- Vector2/3/4 data types are now supported in ViewModels (other data serializeable data types should also work; if you encounter any with issues please let us know).
- Asset data types are now supported, e.g. Sprite, AudioClip, etc.
- XmlLayout v1.91:
- Nested objects are now supported in ViewModels, provided those objects extend XmlLayoutViewModelChild; some limitations apply - specifically, this won't work with lists; and lists may not work if they are properties of nested objects.
Getting Started with MVVM
Enabling MVVM
To enable or disable MVVM functionality, open the XmlLayout Configuration object (via the Assets -> XmlLayout -> Configuration menu item), and click the button labelled 'Enable MVVM Functionality' (or 'Disable MVVM Functionality' if it is already enabled).
</EnablingMVVM>
Basic Concepts
- View:
A view is the user interface that your user sees. In XmlLayout, the view is constructed through the use of Xml. - Model:
The model is the source of your data; whether it be from a database, loaded from a text file, or generated dynamically at run-time. - ViewModel:
The ViewModel is the connection between your Model (data source), and your View (data representation). In XmlLayout MVVM, you create your own custom class to store the data which will be used by the view. - Controller:
The Controller is a class which XmlLayout will use to, among other things, handle events triggered by the view. In XmlLayout MVMM, the controller provides the reference to the ViewModel which you can use to manipulate ViewModel properties. - Data Binding:
Data binding refers to elements within the view being bound to particular view model properties, for example, an input field may get its displayed value from a view model property.
- Two-Way binding: This is the default binding mode. With two-way binding, elements capable of changing value (e.g. input fields, dropdowns, etc.) will automatically update the view model properties they are bound to when their value changes.
- One-Way binding: This is an optional binding mode. With one-way binding, elements will get their values from a ViewModel property, but if their values are changed in the interface, the view model will not be updated to match (at least, not automatically).
Details on how to specify which binding type to use for a variable will be shown later.
</BasicConcepts>
Creating a simple ViewModel
The first thing you need to do is create a new XmlLayout with its own XmlLayoutController (using the Add New XmlLayout Wizard). If you already have an XmlLayoutController, then you can skip this step.
If you are unsure how to do this; please consult the relevant documentation here.
Your XmlLayoutController should then look something like this:
class MyXmlLayoutController : XmlLayoutController
{
    public override void LayoutRebuilt(ParseXmlResult parseResult)
    {
    }
}
Once you've created your controller, you can now create a view model for it to use.
The view model can be created in the same source file as the controller if you wish, or it can be created in its own (which is probably better practice, but this is entirely up to you).
Here is an example of a simple view model:
public class MyViewModel : XmlLayoutViewModel
{
    public string myFirstVariable { get; set; }
    public string mySecondVariable { get; set; }
    public string myThirdVariable { get; set; }
}
The important things to note here are:
- All ViewModels must inherit from the
XmlLayoutViewModelclass in order to function correctly. - Variables defined in ViewModels should preferably be properties (although auto-properties, as above, are fine). Fields may also be defined, and will work partially, but will have issues when working with two-way binding.
Now, with the ViewModel created, it must be attached to the controller. You can do so by adjusting the controller's class definition as follows:
class MyXmlLayoutController : XmlLayoutController<MyViewModel>
{
And that's it - your ViewModel has now been created and attached to the controller.
</CreatingASimpleViewmodel>
Specifying initial values for a ViewModel
To populate the ViewModels initial data set, the XmlLayoutController provides the PrepopulateViewModelData() method which you can override.
This method will be called the first time ViewModel data is accessed (whether by the view, or by XmlLayout itself), and will only be called once (although you may call it again at any point yourself if you wish).
You can use this method to specify values from the data source (Model) of your choice.
class MyXmlLayoutController : XmlLayoutController<MyViewModel>
{
    protected override void PrepopulateViewModelData()
    {
        // the 'viewModel' property is provided by XmlLayoutController
        viewModel.myFirstVariable = "My First Value";
        viewModel.mySecondVariable = "My Second Value";
        viewModel.myThirdVariable = "My Third Value";

        // if you wish, you could also do it like this instead:
        viewModel = new MyViewModel()
        {
            myFirstVariable = "My First Value",
            mySecondVariable = "My Second Value",
            myThirdVariable = "My Third Value"
        };
    }
}
</SpecifyingInitialValuesForAViewmodel>
Referencing the ViewModel in a View
Basic Example
Here is a very basic example of how you can reference ViewModel values in the view using the vm-dataSource attribute:
<XmlLayout xmlns="http://www.w3schools.com"
           xmlns:xsi="http://www.w3.org/2001/XMLSchema-instance"
           xsi:noNamespaceSchemaLocation="UI/XmlLayout/Configuration/XmlLayout.xsd">

  <Include path="Xml/Styles.xml" />

  <Defaults>
    <InputField textAlignment="MiddleLeft" />
  </Defaults>

  <TableLayout class="noCellBackground" width="480" height="240">
    <Row class="headerRow">
      <Cell>
        <Text class="title">ViewModel Example</Text>
      </Cell>
    </Row>
    <Row class="viewport">

      <Cell dontUseTableCellBackground="true">
        <TableLayout class="outlined" padding="8" cellPadding="8" columnWidths="160 0">
          <Row>
            <Cell>
              <Text class="label">My First Variable</Text>
            </Cell>
            <Cell>
              <!-- This InputField is bound to our ViewModel's 'myFirstVariable' property -->
              <InputField vm-dataSource="myFirstVariable" />
            </Cell>
          </Row>

          <Row>
            <Cell>
              <Text class="label">My Second Variable</Text>
            </Cell>
            <Cell>
              <!-- This InputField is bound to our ViewModel's 'mySecondVariable' property -->
              <InputField vm-dataSource="mySecondVariable" />
            </Cell>
          </Row>

          <Row>
            <Cell>
              <Text class="label">My Third Variable</Text>
            </Cell>
            <Cell>
              <!-- This InputField is bound to our ViewModel's 'myThirdVariable' property -->
              <InputField vm-dataSource="myThirdVariable" />
            </Cell>
          </Row>
        </TableLayout>
      </Cell>
    </Row>

  </TableLayout>

</XmlLayout>
This view, combined with our controller and ViewModel, produces the following result:
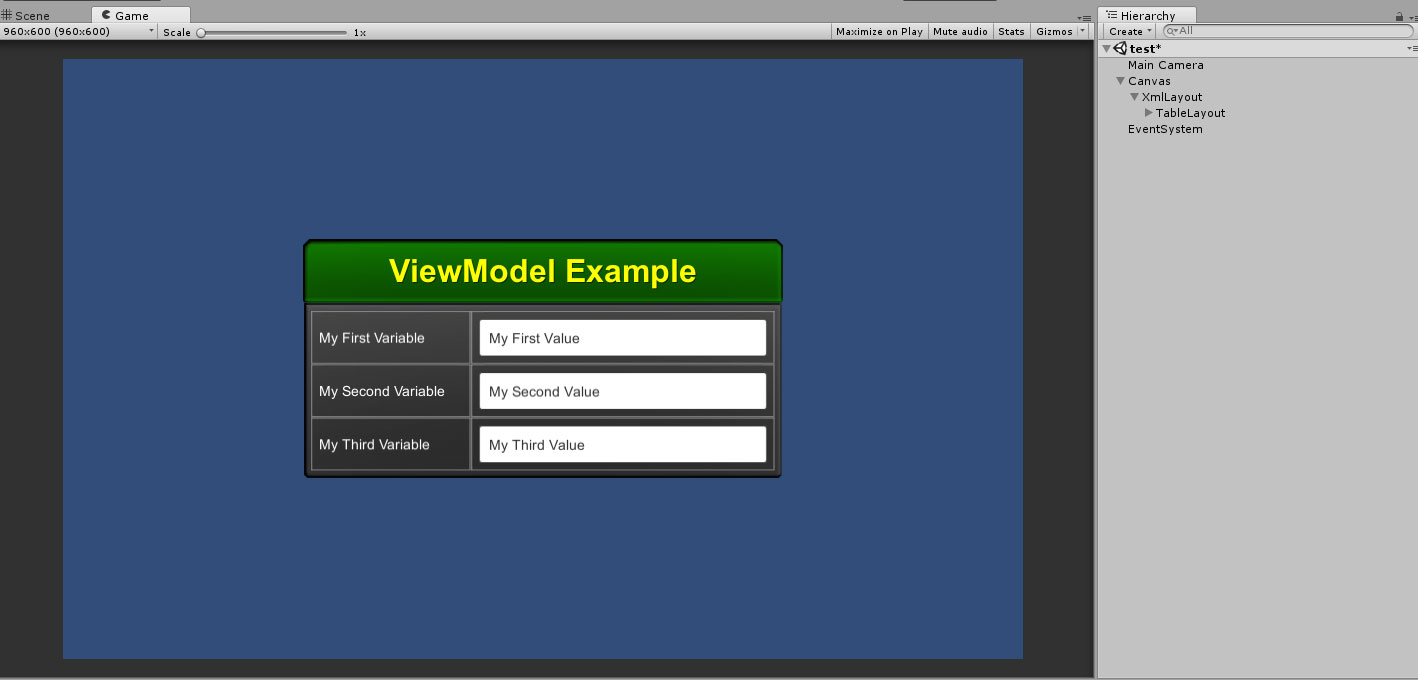
As you can see, the values from our ViewModel have been used for each of the InputField elements.
Data Binding
By default, all binding is Two-Way, so if you were to change the value in the InputFields while in play mode, the value(s) of the ViewModel itself will be updated to match immediately.
If you wish to use One-Way binding instead, simply preface the vm-dataSource attribute with a leading question mark (?), for example:
<InputField vm-dataSource="?myFirstVariable" />This will prevent the element from propagating changes back to the ViewModel.
Dropdown Lists
Dropdown lists are a special case for MVVM in that they have two datasource attributes; one to determine the available options (vm-options) and one to determine the selected value (vm-dataSource).
Here is an example of how to bind a dropdown list element to a ViewModel (note that you can still set the options using other methods, such as manually specifing them in the view if you wish to do so)
ViewModel
public class MyViewModel : XmlLayoutViewModel
{
    public ObservableList<string> myDropdownOptions { get; set; }
    public string myDropdownValue { get; set; }
}
XmlLayout uses the ObservableList collection (provided by XmlLayout) to monitor for changes and replicate them to the view. For a dropdown list's options, this should always be an ObservableList<string> in order for it to function correctly.
The property providing the dropdown list's value on the other hand can be a string (the text value of the selected option), or an integer (the index of the selected option).
Controller
class MyXmlLayoutController : XmlLayoutController
{
    protected override void PrepopulateViewModelData()
    {
        viewModel.myDropdownOptions = new ObservableList()
        {
            "Option One",
            "Option Two",
            "Option Three"
        };

        viewModel.myDropdownValue = "Option Three";
    }
}
View
<XmlLayout xmlns="http://www.w3schools.com"
           xmlns:xsi="http://www.w3.org/2001/XMLSchema-instance"
           xsi:noNamespaceSchemaLocation="UI/XmlLayout/Configuration/XmlLayout.xsd">

  <Include path="Xml/Styles.xml" />

  <TableLayout width="480" height="64" cellPadding="8" columnWidths="128 0">
    <Row>
      <Cell>
        <Text class="label">Dropdown List</Text>
      </Cell>
      <Cell>
        <Dropdown vm-dataSource="myDropdownValue" vm-options="myDropdownOptions" />
      </Cell>
    </Row>
  </TableLayout>

</XmlLayout>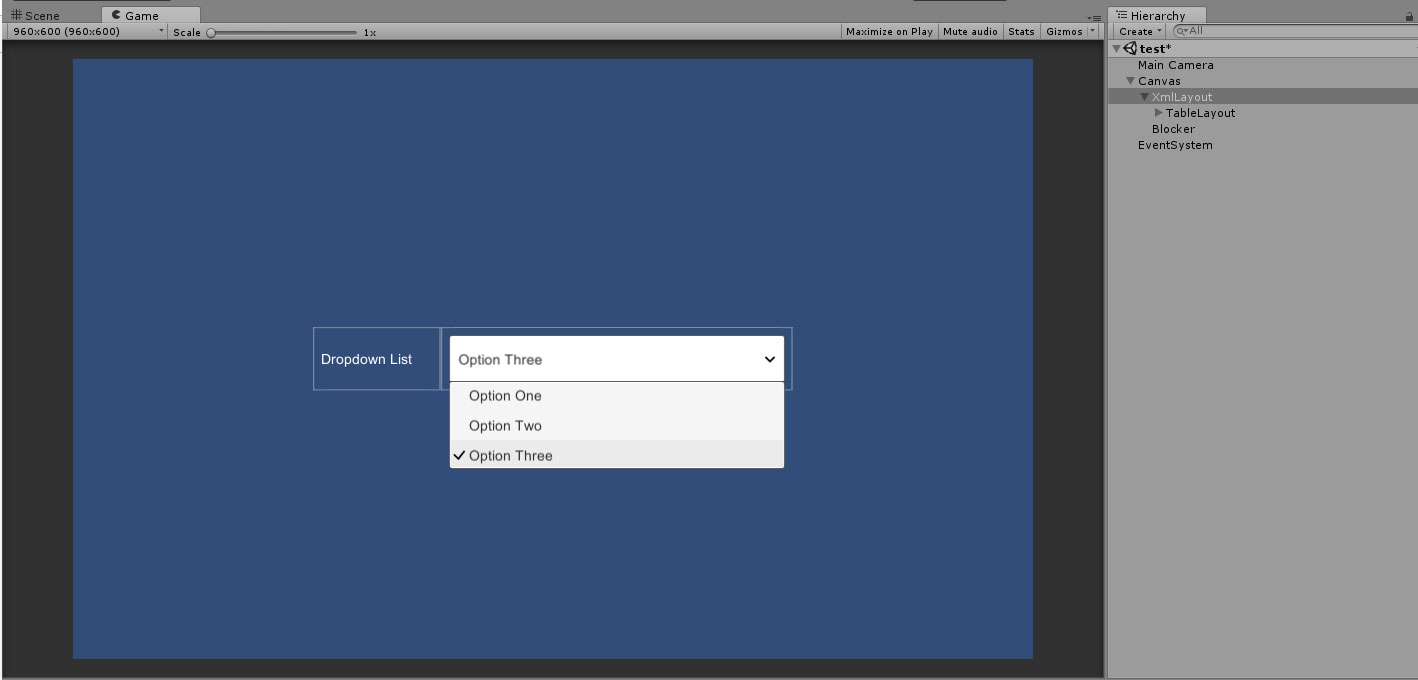
Inline Attributes
In addition to vm-dataSource attribute, you can also use ViewModel properties in an inline fashion, e.g:
<Text>The value of the inline attribute is '{myInlineAttribute}'.</Text>However, this is not generally recommended in most circumstances.
The reason for this is that inline attributes such as in the above example are substituted directly into the Xml prior to building the interface, which means that, if the value of variable is changed
in the ViewModel, XmlLayout will need to generate an updated set of Xml and rebuild the entire interface. This isn't necessarily a problem in all scenarios; but a layout rebuild does result
in elements being reset to their default values (which won't be an issue if they are bound to ViewModel properties using two-way binding), but in some scenarios it could cause unexpected behaviour.
It is also slightly less performant than using the vm-dataSource attribute - layout rebuilds are fairly fast; but changing the value of a single element to match the ViewModel is faster.
- + Allows you to use ViewModel properties anywhere within the view, even as part of an attribute
- - May cause unexpected issues
- - Less performant than using
vm-dataSource
</ReferencingTheViewmodelInAView>
MVVM List Element
List Usage
When you need to create multiple elements from a single data source, XmlLayout's new <List> tag has you covered.
The List tag allows you to create multiple copies of any Xml element based on the content of a List in the ViewModel. This 'List' will be kept up to date by XmlLayout, if you remove items from the list, they will be removed from the view, and similarly, if you add new items, make changes to existing items, or re-order items in the list, the view will be updated.
Here is a simple example showing how table rows can be repeated using the List tag (note: any element can be repeated; this is just an example)
ViewModel
public class MyViewModel : XmlLayoutViewModel
{
    public ObservableList<MyListItem> myList { get; set; }

    /// <summary>
    /// List items must extend 'ObservableListItem' in order for XmlLayout
    /// to be able to monitor their properties for changes.
    /// </summary>
    public class MyListItem : ObservableListItem
    {
        public string itemPropertyOne { get; set; }
        public int itemPropertyTwo { get; set; }
    }
}
The data source for a List tag must always be an ObservableList, although the items in the list can be of any type that extends ObservableListItem.
View
<XmlLayout xmlns="http://www.w3schools.com"
           xmlns:xsi="http://www.w3.org/2001/XMLSchema-instance"
           xsi:noNamespaceSchemaLocation="UI/XmlLayout/Configuration/XmlLayout.xsd">

  <Include path="Xml/Styles.xml" />

  <Defaults>
    <Text class="label" alignment="MiddleCenter" />
  </Defaults>

  <TableLayout width="480" height="256" cellPadding="8">
    <List vm-dataSource="myList">
      <Row>
        <Cell>
          <Text class="label" text="{myList.itemPropertyOne}" />
        </Cell>
        <Cell>
          <Text class="label" text="{myList.itemPropertyTwo}" />
        </Cell>
      </Row>
    </List>
  </TableLayout>

</XmlLayout>
The List tag's vm-dataSource propety defines which ObservableList in the ViewModel to bind to (in this case, 'myList').
You can use properties within the item as values for any attribute of any child element within the List tag using the following format:
{listName.propertyName}
As before, if you wish to use one-way binding, then lead with a question mark, e.g.:
{?listName.propertyName}
Please note that while the syntax is similar, list item properties are not inline attributes and do not require a layout rebuild when their values change.
Note: at the moment, the Xml will fail validation if you use one of these properties in a field which does not accept string values (e.g. boolean attributes).
However, this will not prevent it from working in Unity/XmlLayout, it is essentially just a warning. This should be fixed in the next XmlLayout update.
Fixed in v1.19
Controller
class MyXmlLayoutController : XmlLayoutController<MyViewModel>
{
    protected override void PrepopulateViewModelData()
    {
        viewModel.myList = new ObservableList<MyViewModel.MyListItem>()
        {
            new MyViewModel.MyListItem { itemPropertyOne = "One", itemPropertyTwo = 1 },
            new MyViewModel.MyListItem { itemPropertyOne = "Two", itemPropertyTwo = 2 },
            new MyViewModel.MyListItem { itemPropertyOne = "Three", itemPropertyTwo = 3 },
            new MyViewModel.MyListItem { itemPropertyOne = "Four", itemPropertyTwo = 4 },
            new MyViewModel.MyListItem { itemPropertyOne = "Five", itemPropertyTwo = 5 },
            new MyViewModel.MyListItem { itemPropertyOne = "Six", itemPropertyTwo = 6 },
        };
    }
}
Result
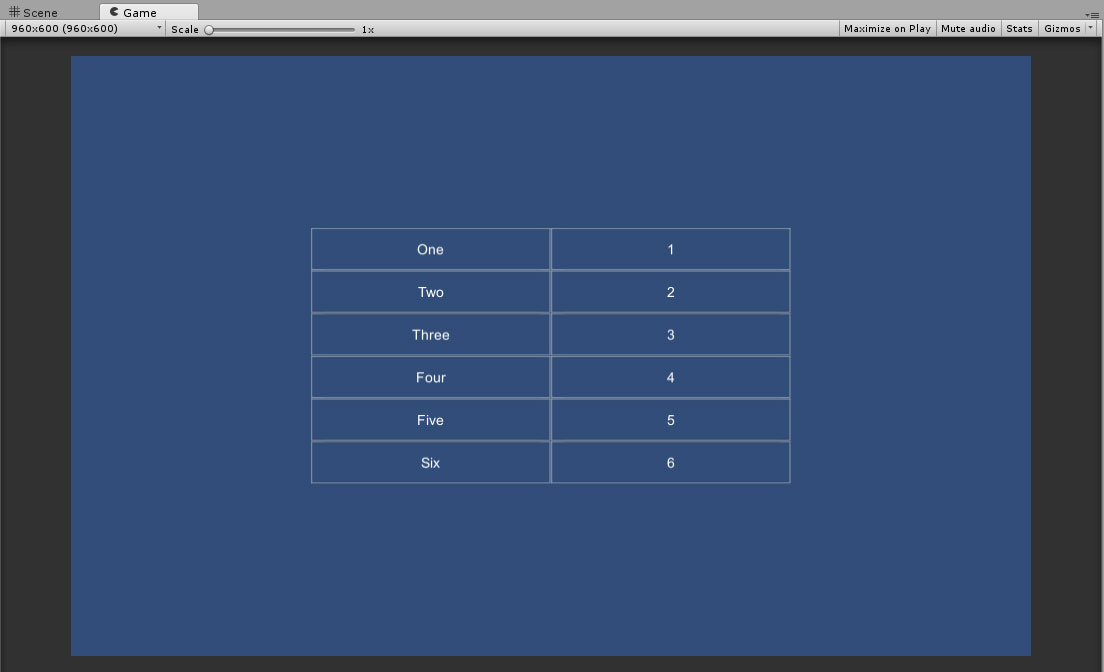
As you can see, the contents of the List tag have been repeated for each element in myList, using the values from each item where appropriate.
If the contents of the list are changed in any way, the user interface will be updated to match automatically.
</ListUsage>
DataTable Element
DataTable Usage
The DataTable element is a convenient way of rendering data from an ObservableList in a tabular format (using a TableLayout element).
As with the List element, DataTable has been designed to work with MVVM (although it can be used with MVC as well), and as such will respond to any changes made to
any ObservableList it is bound to.
At the moment (v1.22), DataTable is only capable of rendering text cells, so any data it is provided with will be converted into strings before being rendered, but in future, additional cell types will be added so that other data types can be rendered correctly.
An example showcasing the DataTable in action can be found in the XmlLayout/Examples/MVVM/DataTable folder.
ViewModel
class DataTableExampleViewModel : XmlLayoutViewModel
{
    public ObservableList myData { get; set; }
}

class DataTableExampleListItem : ObservableListItem
{
    public DataTableExampleListItem(string c1, string c2, string c3, string c4)
    {
        col1 = c1;
        col2 = c2;
        col3 = c3;
        col4 = c4;
    }

    public string col1 { get; set; }
    public string col2 { get; set; }
    public string col3 { get; set; }
    public string col4 { get; set; }
}
Controller
class DataTableExampleController : XmlLayoutController
{
    protected override void PrepopulateViewModelData()
    {
        viewModel.myData = new ObservableList()
        {
            new DataTableExampleListItem("A", "B", "C", "D"),
            new DataTableExampleListItem("E", "F", "G", "H"),
            new DataTableExampleListItem("I", "J", "K", "L"),
            new DataTableExampleListItem("M", "N", "O", "P"),
        };
    }

    void MVVM1_AddItem()
    {
        viewModel.myData.Add(new DataTableExampleListItem("New", "New", "New", "New"));
    }

    void MVVM1_RemoveLast()
    {
        if (viewModel.myData.Any()) viewModel.myData.RemoveAt(viewModel.myData.Count - 1);
    }

    void MVVM1_ChangeLast()
    {
        if (viewModel.myData.Any()) viewModel.myData.Last().col3 = "+++";
    }

    void MVVM1_ReplaceLast()
    {
        if (viewModel.myData.Any()) viewModel.myData[viewModel.myData.Count - 1] = new DataTableExampleListItem("***", "***", "***", "***");
    }
}
View
<Include path="Xml/Styles" />

  <Defaults>
    <Text class="label" alignment="MiddleCenter" fontSize="18" />
    <Cell class="headingCell" overrideGlobalPadding="1" padding="4" />
    <Button tooltipPosition="Above" />

    <DataTableRowTemplate class="header" color="rgb(0.1,0.7,0)" />
    <DataTableRowTemplate class="data" />
  </Defaults>

  <TableLayout width="95%" height="95%" cellPadding="16" class="noCellBackground">

    <Row preferredHeight="64" class="headerRow">
      <Cell class="headingCell">
        <Text class="label">
          <![CDATA[<b>MVVM #1 (myData)</b>
<size=12>Item Type: DataTableExampleListItem</size>]]>
        </Text>
      </Cell>
    </Row>

    <Row class="viewPort">
      <Cell>
        <VerticalScrollView class="scrollView">
          <DataTable vm-dataSource="myData">

            <DataTableRowTemplate templateType="HeaderRow" class="header">
              <DataTableCellTemplate />
            </DataTableRowTemplate>

            <DataTableRowTemplate templateType="DataRow" class="data">
              <DataTableCellTemplate />
            </DataTableRowTemplate>

          </DataTable>
        </VerticalScrollView>
      </Cell>
    </Row>
    <Row class="viewPort" preferredHeight="80">
      <Cell spacing="4">
        <Button onClick="MVVM1_AddItem">Add Item</Button>
        <Button onClick="MVVM1_RemoveLast">Remove Last</Button>
        <Button onClick="MVVM1_ChangeLast" tooltip="Change one column of the last row.">Change Last</Button>
        <Button onClick="MVVM1_ReplaceLast" tooltip="Replace the last row with a new one.">Replace Last</Button>
      </Cell>
     </Row>
  </TableLayout>
As with the List tag, the data source for a DataTable must always be an ObservableList, although the items in the list can be of any type that extends ObservableListItem.
Known issue: at the moment, there is no way to customise the appearance of the text elements in a DataTable, but this will be corrected in the next version of XmlLayout.
</DatatableUsage>
MVVM Examples
Options Menu Example
<XmlLayout xmlns="http://www.w3schools.com"
           xmlns:xsi="http://www.w3.org/2001/XMLSchema-instance"
           xsi:noNamespaceSchemaLocation="../../Configuration/XmlLayout.xsd"
           height="550" width="512"
           rectAlignment="MiddleLeft">

  <Include path="Xml/Styles.xml" />


  <TableLayout class="noCellBackground">
    <Row class="headerRow">
      <Cell>
        <Text class="title">
          Options
        </Text>
      </Cell>
    </Row>
    <Row class="viewport">
      <Cell dontUseTableCellBackground="true">
        <TableLayout cellPadding="7" padding="20" cellSpacing="5" cellBackgroundImage="Sprites/Outline_Sharp" cellBackgroundColor="rgba(1,1,0,0.125)">
          <Row class="sectionHeaderRow">
            <Cell columnSpan="2" dontUseTableCellBackground="1">
              <Text class="h2" alignment="MiddleCenter">Video</Text>
            </Cell>
          </Row>

          <Row preferredHeight="48">
            <Cell>
              <Text class="h3">Resolution</Text>
            </Cell>
            <Cell>
              <Dropdown id="resolution" preferredHeight="32" onValueChanged="FormChanged();" vm-dataSource="resolution" vm-options="resolutionOptions">
              </Dropdown>
            </Cell>
          </Row>
          <Row preferredHeight="48">
            <Cell>
              <Text class="h3">Quality</Text>
            </Cell>
            <Cell>
              <Dropdown id="quality" onValueChanged="FormChanged();" vm-dataSource="quality" vm-options="qualityOptions">
              </Dropdown>
            </Cell>
          </Row>

          <Row class="sectionHeaderRow">
            <Cell columnSpan="2" dontUseTableCellBackground="1">
              <Text class="h2" alignment="MiddleCenter">Audio</Text>
            </Cell>
          </Row>

          <Row>
            <Cell>
              <Text class="h3">Master</Text>
            </Cell>
            <Cell>
              <Slider id="masterVolume" onValueChanged="FormChanged();" vm-dataSource="masterVolume" />
            </Cell>
          </Row>
          <Row>
            <Cell>
              <Text class="h3">Music</Text>
            </Cell>
            <Cell>
              <Slider id="musicVolume" onValueChanged="FormChanged();" vm-dataSource="musicVolume" />
            </Cell>
          </Row>
          <Row>
            <Cell>
              <Text class="h3">SFX</Text>
            </Cell>
            <Cell>
              <Slider id="sfxVolume" onValueChanged="FormChanged();" vm-dataSource="sfxVolume" />
            </Cell>
          </Row>

          <Row class="sectionHeaderRow">
            <Cell columnSpan="2" dontUseTableCellBackground="1">
              <Text class="h2" alignment="MiddleCenter">Gameplay</Text>
            </Cell>
          </Row>

          <Row>
            <Cell>
              <Text class="h3">Enable Hints</Text>
            </Cell>
            <Cell>
              <Toggle id="enableHints" onValueChanged="FormChanged();" vm-dataSource="enableHints"></Toggle>
            </Cell>
          </Row>

          <Row preferredHeight="44">
            <Cell>
              <Button onClick="ResetForm();">Reset</Button>
            </Cell>
            <Cell>
              <Button id="applyButton" onClick="Apply();" interactable="false">Apply</Button>
            </Cell>
          </Row>
        </TableLayout>
      </Cell>
    </Row>
  </TableLayout>

</XmlLayout>
using System;
using System.Collections;
using System.Collections.Generic;
using UnityEngine;
using UI.Xml;
using System.Linq;
using UnityEngine.UI;
namespace UI.Xml.Examples
{
/// <summary>
/// This is an example of a ViewModel which can be used by XmlLayout's new MVVM functionality
/// </summary>
public class MVVMExampleOptionsMenuViewModel : XmlLayoutViewModel
{
/// <summary>
/// This defines a list of options for the 'Resolution' drop down list.
/// </summary>
public ObservableList<string> resolutionOptions { get; set; }
/// <summary>
/// This defines the selected value for the 'Resolution' drop down list.
/// </summary>
public string resolution { get; set; }
/// <summary>
/// This defines a list of options for the 'Quality' drop down list.
/// </summary>
public ObservableList<string> qualityOptions { get; set; }
/// <summary>
/// This defines the selected value for the 'Quality' drop down list.
/// </summary>
public string quality { get; set; }
/// <summary>
/// This defines the value for the 'Master Volume' slider
/// </summary>
public float masterVolume { get; set; }
/// <summary>
/// This defines the value for the 'Music Volume' slider
/// </summary>
public float musicVolume { get; set; }
/// <summary>
/// This defines the value of the 'Sfx Volume' slider
/// </summary>
public float sfxVolume { get; set; }
/// <summary>
/// This defines whether or not the 'Enable Hints' toggle is selected
/// </summary>
public bool enableHints { get; set; }
}
}using System;
using System.Collections;
using System.Collections.Generic;
using UnityEngine;
using UI.Xml;
using System.Linq;
using UnityEngine.UI;
namespace UI.Xml.Examples
{
/// <summary>
/// This is an example which utilises the new MVVM functionality.
/// The type of ViewModel it uses is specified as the generic parameter, in this case, it is 'MVVMExampleOptionsMenuViewModel' which is defined in MVVMExampleOptionsMenuViewModel.cs
/// </summary>
class MVVMExampleOptionsMenuController : XmlLayoutController<MVVMExampleOptionsMenuViewModel>
{
/// <summary>
/// Populated in the inspector.
/// </summary>
public XmlLayout_Example_MessageDialog MessageDialog = null;
/// <summary>
/// This is an XmlElementReference to the 'Apply' button.
/// This reference will be maintained automatically by XmlLayout between layout rebuilds.
/// </summary>
private XmlElementReference<Button> applyButton;
void Awake()
{
// Populate the 'Apply' button reference.
// (this requires a reference to the XmlLayout controller, so it can only be populated after the instance is created)
applyButton = XmlElementReference<Button>("applyButton");
}
/// <summary>
/// This method will be called by XmlLayout to load the 'initial' view data.
/// It will only be called once (although you can call it again in your own code if you wish)
/// </summary>
protected override void PrepopulateViewModelData()
{
viewModel = new MVVMExampleOptionsMenuViewModel()
{
resolutionOptions = new ObservableList<string>() { "960x600", "1024x768", "1920x1080" },
resolution = "1920x1080",
qualityOptions = QualitySettings.names.ToObservableList(),
quality = QualitySettings.names[QualitySettings.GetQualityLevel()],
masterVolume = 0.80f,
musicVolume = 0.45f,
sfxVolume = 0.55f,
enableHints = true
};
// If you wish, you could also manipulate ViewModel properties here as follows:
/*viewModel.resolutionOptions = new ObservableList<string>()
{
"960x600",
"1024x768",
"1920x1080"
};
viewModel.resolution = "1920x1080";
viewModel.qualityOptions = QualitySettings.names.ToObservableList();
viewModel.quality = QualitySettings.names[QualitySettings.GetQualityLevel()];
viewModel.masterVolume = 0.80f;
viewModel.musicVolume = 0.45f;
viewModel.sfxVolume = 0.55f;
viewModel.enableHints = true;*/
}
/// <summary>
/// This is a regular XmlLayout event which has been set up to be called
/// whenever any of the values of any of the elements in the form are changed
/// </summary>
void FormChanged()
{
// our form data has changed; enable the apply button
applyButton.element.interactable = true;
}
/// <summary>
/// This is a regular XmlLayout event which has been set up to be called
/// whenever the 'Reset' button is clicked
/// </summary>
void ResetForm()
{
// Our form is tied to our ViewModel; if we restore the ViewModel's data to its initial values,
// then our form will also be reset to match
PrepopulateViewModelData();
// disable the apply button again
applyButton.element.interactable = false;
}
/// <summary>
/// This is a regular XmlLayout event which has been set up to be called
/// whenever the 'Apply' button is clicked
/// </summary>
void Apply()
{
// All of the view model properties in this example use two-way binding, which means that the ViewModel itself is updated
// whenever any of their values change; as such, we can utilize the 'viewModel' object to see the new values
MessageDialog.Show("Updated ViewModel Values",
String.Format(@"
Resolution : {0}
Quality : {1}
Master Volume : {2}
Music Volume : {3}
Sfx Volume : {4}
Enable Hints : {5}
", viewModel.resolution, viewModel.quality, viewModel.masterVolume, viewModel.musicVolume, viewModel.sfxVolume, viewModel.enableHints ));
// disable the apply button again
applyButton.element.interactable = false;
}
}
}Example List
List tag.<XmlLayout xmlns="http://www.w3schools.com"
xmlns:xsi="http://www.w3.org/2001/XMLSchema-instance"
xsi:noNamespaceSchemaLocation="../../Configuration/XmlLayout.xsd"
height="550" width="320"
rectAlignment="MiddleRight">
<Include path="Xml/Styles.xml" />
<Defaults>
<TableLayout class="outlined" cellBackgroundImage="Sprites/Outline_Sharp" cellBackgroundColor="rgba(1,1,0,0.125)" />
<TableLayout class="content" cellPadding="7" cellSpacing="5" columnWidths="72 72 0 40" />
</Defaults>
<TableLayout class="noCellBackground">
<Row class="headerRow">
<Cell>
<Text class="title">
Example List
</Text>
</Cell>
</Row>
<Row class="viewport">
<Cell dontUseTableCellBackground="true">
<TableLayout class="outlined" padding="20">
<Row class="sectionHeaderRow">
<Cell>
<Text class="h2" alignment="MiddleCenter">A</Text>
</Cell>
<Cell>
<Text class="h2" alignment="MiddleCenter">B</Text>
</Cell>
<Cell>
<Text class="h2" alignment="MiddleCenter">A + B</Text>
</Cell>
</Row>
<Row>
<Cell columnSpan="4">
<VerticalScrollView class="scrollview">
<TableLayout class="content outlined" autoCalculateHeight="true">
<!-- MVVM List Component -->
<List vm-dataSource="listItems">
<Row preferredHeight="48">
<Cell>
<InputField textAlignment="MiddleCenter" text="{listItems.column1}" />
</Cell>
<Cell>
<InputField textAlignment="MiddleCenter" text="{listItems.column2}" />
</Cell>
<Cell>
<Text class="h3" alignment="MiddleCenter" text="{listItems.combined}" />
</Cell>
<Cell>
<Button onClick="Remove({listItems.item})">X</Button>
</Cell>
</Row>
</List>
<!-- /MVVM List Component -->
</TableLayout>
</VerticalScrollView>
</Cell>
</Row>
<Row preferredHeight="48">
<Cell columnSpan="4">
<Button onClick="AddElement()">Add Element</Button>
<Button onClick="ChangeLast()">Change Last</Button>
</Cell>
</Row>
</TableLayout>
</Cell>
</Row>
</TableLayout>
</XmlLayout>using System;
using System.Collections;
using System.Collections.Generic;
using UnityEngine;
using UI.Xml;
using System.Linq;
using UnityEngine.UI;
namespace UI.Xml.Examples
{
/// <summary>
/// This is an example of a ViewModel which can be used by XmlLayout's new MVVM functionality
/// </summary>
public class MVVMExampleListViewModel : XmlLayoutViewModel
{
/// <summary>
/// This is a list of items which will be rendered by XmlLayout
/// </summary>
public ObservableList<ExampleListItem> listItems { get; set; }
}
/// <summary>
/// Items stored in an Observable list should always extend 'ObservableListItem',
/// so that their fields and properties can be monitored by XmlLayout
/// </summary>
public class ExampleListItem : ObservableListItem
{
// These properties will be monitored for changes by XmlLayout and replicated to the view
public string column1 { get; set; }
public string column2 { get; set; }
// This property will also be replicated to the view
public string combined
{
get
{
return String.Format("{0}{1}", column1, column2);
}
}
}
}using System;
using System.Collections;
using System.Collections.Generic;
using UnityEngine;
using UI.Xml;
using System.Linq;
using UnityEngine.UI;
namespace UI.Xml.Examples
{
/// <summary>
/// This is an example which utilises the new MVVM functionality.
/// Specifically, this ViewModel provides a list of items, from which XmlLayout will create elements in the view.
/// </summary>
class MVVMExampleListController : XmlLayoutController<MVVMExampleListViewModel>
{
/// <summary>
/// This method will be called by XmlLayout to load the 'initial' view data.
/// It will only be called once (although you can call it again in your own code if you wish)
/// </summary>
protected override void PrepopulateViewModelData()
{
// Add a few sample items to our list
viewModel.listItems = new ObservableList<ExampleListItem>()
{
new ExampleListItem { column1 = "A", column2 = "B" },
new ExampleListItem { column1 = "C", column2 = "D" },
new ExampleListItem { column1 = "E", column2 = "F" },
};
// Please note: any lists that you do not populate here should at the very least be instantiated;
// failing to do so may result in null exceptions
}
/// <summary>
/// This is a regular XmlLayout event which has been set up to be called
/// whenever the 'Add Element' button is clicked
/// </summary>
void AddElement()
{
// Add a new item to the list
viewModel.listItems.Add(new ExampleListItem { column1 = "Z", column2 = "Z" });
// You may also insert, or add ranges of items, e.g:
//viewModel.listItems.Insert(0, new ExampleListItem { column1 = "Ins", column2 = "erted" });
//viewModel.listItems.AddRange(new List<ExampleListItem>() { new ExampleListItem { }, new ExampleListItem { } });
}
/// <summary>
/// This is a regular XmlLayout event which has been set up to be called
/// whenever the 'Change Last' button is clicked
/// </summary>
void ChangeLast()
{
// Find the last item in the list via LINQ
var item = viewModel.listItems.LastOrDefault();
if (item != null)
{
// change a value
item.column1 = "$";
}
}
/// <summary>
/// This is a regular XmlLayout event which has been set up to be called
/// whenever the 'X' button in a list item is clicked
/// The method arguments for MVVM list items are as follows:
/// {listName.item} => The item itself (as shown here)
/// {listName.index} => The index of the item in the list (integer)
/// {listName.guid} => The GUID of the list item (string)
/// </summary>
void Remove(ExampleListItem item)
{
// Remove the specified item from the list
viewModel.listItems.Remove(item);
}
}
}Preview
